Feeds:
Posts
Comments

Here are some of you that visited our booth at the Botanical Garden Fair this year. There were some GREAT pictures of you with our Pig statue.  Subscribe to our Blog and get regular updates of what’s going on at Flowerama.

Send a link to your friends and let them see you on the Internet with our pig. You can also see your picture on our Facebook page.  Become a fan of us on Facebook.

This slideshow requires JavaScript.

The Botanical Garden FAir is a wonderful event for those of you that love gardening.  Check them out at www.GBBG.org .

Spring is finally here! We can finally enjoy the sun and play in the great outdoors. But alas just as we can start to enjoy it we have to deal with those pesky mosquitoes. Will mother nature never cut us a break?! We don’t want to have to fumigate our whole yard with toxic chemicals just so we can get outside. So what else can we do you ask? Well, here are some plants and animals that insects, including mosquitoes, don’t like.

Both Catnip and Rosemary are quite effective at keeping insects away. The oil from catnip has been found to be many times more effective than even DEET. Rosemary is a very popular garden herb that also has an oil in it that repels mosquitoes. Plant a few pots of it around your deck or patio and not only will your friend think you to be very trendy for having your own herb garden, but you they’ll think you’re a survivalist for knowing it keeps mosquitoes away. Because rosemary doesn’t do well in cold weather be sure to pull it inside for the winter so you have it to put back outside the next year.

Marigolds have an odor that many insects don’t like. They are good plants for repelling mosquitoes as well as aphids and other insects that can attack vegetables. One possible down side to marigolds is that some people don’t like the smell of them. I happen to love the smell! So for me that isn’t an issue.

Birds are also a good alternative. They have a high metabolism and have to eat constantly in order to function. By making your yard a good home for them you can keep the insect population low. Birds that thrive mainly on insects are swallows, wrens, martins and warblers. The seed eating birds feed insects to their babies because they are a better source of protein. Check out this site for more information on how to attract birds.

To a beginner the idea of planting plants around the yard to enhance the landscaping can be a bit overwhelming. Well don’t fret. It’s not en exact science. It’s more a matter of what you think looks good. Pick out one area of your yard and start with that. A great way to get ideas is to look at what other people have and did with their planting and pick out what is eye-catching to you and fits into your budget. Places you can do this is look at what your neighbors are doing, or check out public parks. Something that we have locally (in Green Bay, WI) that is great for getting ideas is the Green Bay Botanical Gardens. One tour of their grounds and you’ll be excited at all the ideas you will get not only with how to place plants but all the different varieties of plants that are possible. Not to mention that it is a very relaxing place to visit. Make sure to note whether the plants you like are in sun or shade as that will determine what will and will not work in your own yard. Another great place you might try to get ideas is to check with some of your local garden centers. A few of them will do a landscaping plan for a small charge or for free in exchange for buying plants from them. One that will do a landscape plan for free here locally is Scenicview Landscapes in Suamico, WI. They will just ask that you purchase their plants with them but is not required. One of their landscape staff will come right to your home.

Once you decide what plants you would like to plant , next is under taking the easy task of actually planting your plants.

  1. Decide where you are putting your plants: Once you have somewhat of an idea of what types of plants you would like to plant and have somewhat of an idea of where you would like to place them here’s how you can finalize the process. Leave the plants in the container and place them where you think you would like to plant them. If you don’t think it looks quite right then you can move them around. Just keep moving them until you are happy with where you have them placed. Don’t move them once you decide where you are going to put them otherwise you will have to go through the whole thing again. Where the pot is sitting is where you will dig your hole for planting.
  2. Digging the hole: To a person who hasn’t done any planting before even a simple thing like digging a hole can make them uncomfortable. How big should the hole be? How Deep? A good rule of thumb is to dig your hole right below where you placed the pot and a little deeper than the container the plant came in. That way you can make the soil below the plant a little loose so the roots will have an easier time growing into the soil below. You also want to make the hole a little wider then the pot so that there is some room for you to get your hands in there and settle the plant in the hole and make sure it’s straight.
  3. Remove the plant from the pot: The easiest way to remove the plant is to squeeze around the pot quite a few times to loosen the plant from the sides. Then gently grab the plant from the stem close to the soil and start to turn the pot upside down. The plant, soil and roots should al slide out into your hand. If the plant doesn’t release from the pot you can try pushing on the bottom of the pot to loosen the roots and soil from the bottom. As a last resort you might have to gently cut the pot away from the plant.
  4. Planting the plants: Start by spreading the roots out in the bottom of the hole. If the roots are too compact try to gently separate them. Try not to damage the roots but don’t worry if a few of the tiny roots get broken. Just don’t be too rough. Next make sure that the plant is straight and is placed at a depth that is approximately the same as it was in the pot or just a bit deeper. Then start filling up the spaces below and around the plant with the soil that you removed from the hole. Pat the soil down so that it is firm enough to make sure that there are no air bubbles but not too compact.

Then water the plant and give it some fertilizer. Continue to water the plant daily for a week or so until the roots have a chance to establish themselves. Repeat this process for each of the plants in your landscape project.

Then stand back and enjoy a job well done!

.

Flowerama Green Bay and Appleton – for all your Floral needs – Delivering Flowers to Green Bay and the surrounding area.

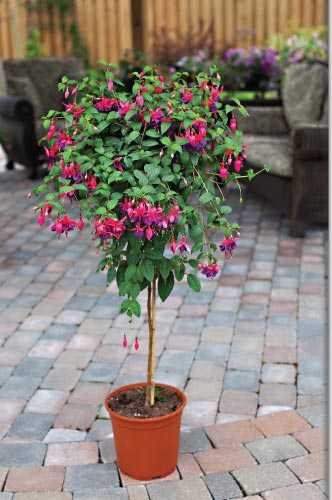
Fuchsia tree

Looking for something different? Need something that takes some shade? A fuchsia tree can be a beautiful new addition to any deck, porch or landscaping design.

Fuchsias don’t like temperatures too hot so make sure they have some shade from the mid summer sun.  Keep soil moist but don’t over water or the plant will start to thin due to root rot.  So, make sure that the container has good drainage.  Blooms take form on new growth so pinch the plant periodically throughout the summer to keep the plant blooming.

To keep your fuchsia tree over winter keep it in a place where it won’t frost just as you would with any of your annuals. Now is also the best time to prune it.  Cut it back to a shape that you want to begin with next spring.  Make sure that the roots aren’t too dry or too wet over the winter so be sure to check it regularly.

In spring you will need to transplant into a little larger pot, do some root pruning and add some new soil.  Pinch new growth to provide the plant shape you desire.

Last spring I was walking through the greenhouse inspecting the variety of hanging baskets and enjoying the vast array of colors that make you feel alive that time of year.  As I walked through I had a startling distraction as something quickly flew past me a little too close for comfort.  Snapping my head around I was expecting to see what I normally saw as a seemingly large fuzzy ball of black and yellow .  Bumblebees were a pretty common sight sitting on a basket as I walked by on sunny days like this.  I would usually come an uncomfortable eye to eye with them as I staggered around the suspended obstacle course of color that draped around the greenhouse.  To my surprise what I saw instead was a hummingbird flitting from flower to flower. Pausing only briefly at about five or six fuchsia blooms before quickly exiting the greenhouse.  I had never seen a hummingbird so close before.  It puts you in a state of being Alice in Wonderland for a moment until you snap back to the reality of what you need to be doing.  Also, it’s interesting how when something like that happens to you that you suddenly become much more aware of your surroundings.

As I continued  my enjoyable task of checking out the quality, colors and combinations of hanging baskets in the other houses I found myself peaking around plants to the top of the greenhouse on the off chance of catching another novel sight only to be disappointed.  Completing my inspection I made one last trip back to the fuchsia house to see if my new found entertainer had returned.  Entering for my final walk thru I glanced down the first tunnel of fuchsias that hung double stacked.  There, about a quarter of the way up the aisle just above eye level I could see my hovering friend.  I walked slowly toward him hoping not to scare him. I got to within about four plants of him before he flitted up to the second tier of plants closer to the roof and around the back side of the basket.  I slowly squeezed my head between to plants to look down the back side of the aisle.  There towards the top of the greenhouse to my surprise was my friend with a companion.  Two!  A matching set!  One hovering just above eye level about five baskets down, the second just above that.  I followed them around the greenhouse for a few minutes until I spotted a third hummingbird!  I was back in Wonderland.   They spent all their time jumping from fuchsia to fuchsia.  I took my time following them around for what seemed like all day but when all was said and done was only about 10 minutes.  Those sites danced in my head for the rest of the day.  I’ve seen them since then a few times but as we all know nothing stands out like your first time.

This spring I’ll make an effort to have my camera with me again.  My goal is to actually get video of them this year.  If I’m able to capture them on video this spring I’ll share it with you so stay tuned in.

So when you stop into Flowerama this spring for your hanging baskets and see all the fuchsias hanging out front maybe you’ll see one of our friends and be able to take a little trip with Alice to Wonderland for yourself.

Cinco de Mayo

Cinco de Mayo

The History of Cinco de Mayo: As the word says it’s celebrated in May 5th.  Cinco de Mayo celebrates the anniversary of the Battle of Puebla in 1862, when Mexican troops defeated invading French forces. The holiday has become increasingly observed in areas of the US with high concentrations of Mexican-Americans. Celebrations focus on Mexican culture, food, and music.

The Easter Lily


Easter Lily

The Easter Lily is a beautiful symbol of hope and new life. It originated in Japan and was brought to the US by a World War I soldier. There are many biblical and mythical references to this elegant trumpet shaped flower that has now become the traditional Easter Flower. Many churches surround their alters to symbolize the resurrection of Christ. Whether it is found in the church or in your home, the Easter lily reminds us to celebrate and rejoice.

When choosing an Easter Lily, look for one that has blooms in various stages. Look for rich green foliage and for a plant that is around two times tall the size of its pot. Keep it away from cats because they can be poisonous if digested. Remove the yellow anthers as the Easter Lily blooms open to prolong the life of the plant and prevent staining of the white flowers. Be careful though, because the yellow anthers will stain if you get it on your clothes (or table cloth!) See our plant care section for more tips on caring for your plant once you get it home.

No gardener wants bugs eating holes in their plants or destroying their vegetables. Fortunately, for every insect or bug that ruins all your hard work, there are other predatory species that feed on the plant-eaters. So be careful to avoid exterminating these helpful organisms:

Lady beetles (aka ladybugs or ladybirds) are effective against aphids, scale insects, mealybugs, and mites. Though lady beetles are available to purchase in bulk, it is generally not especially helpful to buy them. These are migratory insects, and as soon as they wake from the hibernation they are transported in, most of them are likely to leave.

Green lacewing larvae (aphid lions) combat infestations of spider mites, thrips, leafhoppers, whiteflies, and caterpillar eggs.

Praying mantis in the nymph stage begin preying on insects as small as mosquitoes as soon as they hatch in the spring.

Syrphid flies eat aphids and serve as valuable pollinators.

Ground beetles are sometimes mistaken for cockroaches, but are actually very useful for controlling pest populations. Most of these species are black, green, or bronze, often with metallic iridescence.1 These are the beetles to turn to for gypsy moth outbreaks.

Rove beetles prey on snails and certain types of maggots. You can spot them by looking for the wing covers that are so short they leave most of the abdominal segments visible, and by the way they carry their abdomen pointing upward.2 They love to live in compost piles and mulches.

Spiders may be scary to some, but they eat insects of all kinds, including those that threaten your plants.

There are many different species of predatory mites, but all will help your garden by eating the mites you consider pests. They live in the upper layers of soil where you may not even see them, so be careful about spreading pesticides.

Centipedes can be found hidden under boards or leaves in damp soil. These fast-moving predators control a variety of pests both indoors and outdoors.

Hover flies (syrphids) may look like yellowjackets at first, but they will not sting you. When they are fully mature they eat only nectar and pollen, but in the larva stage they feed on aphids and leafhoppers.

While bees won’t attack any pests, they are still one of the most efficient pollinators in the insect world. Don’t break out the bug spray—instead, welcome them into your garden with flowering plants.

The wasps you want in your garden fall into three categories: social wasps, solitary wasps, and parasitic wasps. You’re probably most familiar with social wasps, which include yellowjackeets, hornets, and paper wasps. Though they are notoriously aggressive, yellowjackets and hornets are beneficial because they will feed on almost any insect, including many common pests.3 Paper wasps are much more docile, and are distinctive because of their thin waists. When starting a new colony, paper wasps are especially effective against pests, killing thousands of caterpillars within a few weeks.4 Solitary predatory wasps hunt pest species almost exclusively.5 Though they are small, parasitic wasps are very effective for controlling unwanted organisms, such as aphids, in your garden.

Flowerama Green Bay and Appleton, Wisconsin. We deliver flowers to all sorrounding areas.  The Florist serving all your Floral needs.  Flowers for all occasions: Sympathy, Wedding, Anniversary, Birthday, Plants, Gifts, Balloons.

House Plants
 
1. WATER
  
Over-watering is probably the number one killer of foliage plants. Customers rarely are taught how to irrigate plants properly or how to determine irrigation needs accurately. Many tropical plant varieties appear thirstier than they actually are, and this leads to consumers keeping houseplants in overly wet conditions. But what actually happens when a plant is over-watered? It isn’t that the plants take up excess moisture and die. It is that soilborne diseases proliferate in overly wet conditions, leading to root rot and ultimately to the plant’s untimely demise. Unfortunately, plants in overly wet conditions tend to wilt, prompting consumers to apply even more water, worsening the plants condition.
Additionally, even in the absence of pathogens, roots trying to grow in soggy conditions will be asphyxiated. Advise customers to feel the potting mix or the weight of the pot when deciding whether to water. Soil in containers usually dries from the top down; just because the top is dry doesn’t mean it is time to add more water. Tell the consumer: when in doubt—wait it out. Water quality is also important. Tap water typically contains four times the amount of fluoride considered safe for fluoride-sensitive houseplants (most of which are in the lily family). Water softeners remove calcium and magnesium from hard water but they replace those minerals with sodium, which is not a plant nutrient and can cause severe problems in house plants. Advise customer to collect rainwater whenever possible, it is usually well aerated, which can be a significant benefit. Another option is to collect a jug of tap water and leave the cap off for 24 hours to allow the unnecessary minerals to evaporate. 
2. DROUGHT
 On the opposite end of the spectrum, drought stress also kills houseplants. As busy as most people are, they forget to water their plants, and often it is too late. Plants that become excessively dry generate hormones in the roots that cause leaf drop if the drought stress continues long enough. It is also common for people to over-water plants that are over-dry. These gyrations in soil moisture levels are detrimental to the plant’s health. If plants become overly dry, only remoisten them back to reasonable levels. Advise customers to resist the temptation to make up for the moisture deficiency  by adding too much water. 
3. FERTILIZER 
Another common cause of plant death is fertilizer. Excess fertilizer can result from the carryover of fertilizers used by commercial growers, as well as from excessive fertilizing by the consumer. Plants in low light, interior environments need a lot less fertilizer than plants growing in high light under tropical conditions. Transition is difficult for the plants. 
4. LOW LIGHT
Low light is also a major problem for foliage plants in the home. Foliage varieties generally are tolerant of low-light conditions, but growers produce foliage plants under light levels in order to increase growth rates. Houseplants need to be properly acclimated to the interior environment prior to sale. Plants also have something called the light compensation point, or the amount of light required by a plant variety to stay alive. If the houseplant is grown under less light than its light compensation point, no matter what is done, the plant will slowly and steadily decline, ultimately dying.
5. TEMPERATURE 
Other than a few plants, such as ivy, most houseplants are truly tropical. This means that they don’t like cold weather, even for a few minutes. For example, an aglaonema Silver Queen will sustain cold  damage symptoms at 58 °F. Cold drafts are especially uncomfortable to tropical plants that come from a jungle environment. Low humidity in interior environments brought about by heating and air conditioning are also particularly troubling to plants that hail from humid tropics. 
6. PESTS 
Insects and mites are another cause of tropical plant fatality. Some houseplant pests are tiny, going unnoticed for many months as their populations increase. Mealy bugs and scale insects often hide in crevices, building to explosive populations before they are discovered. Once these populations of insects and mites become large, the pests are hard to control.